Realtek 2.5G Ethernet on TrueNAS Core
Building the RTL8125B kernel module for TrueNAS (FreeBSD) 12.2
1000Base-T Ethernet is sssooo 1990’s. In all seriousness, IEEE 802.3ab came out in 1999. Consumer or home networking speeds have stagnated in the 20+ years since. While super fast networking equipment of 100Gbps and up is available, it’s quite expensive.
However, to affordably bridge the gap between 1G and 10G networking equipment, 2.5G networking (2.5GBASE-T) equipment is popping up more and more. It’s cheap, and existing Ethernet lines can easily handle it.
So, let’s figure out how to get a home NAS, running TrueNAS Core, setup.
Update: These instructions also work for FreeBSD 13.0, 13.1, and Realtek driver version 1.97.00. Just substitute an updated version string where appropriate.

The Hardware
I have a small rack of equipment at home, mostly populated with old, semi-retired computer equipment from previous desktop builds. I also have some shiny new Ubiquity network equipment and a custom built NAS computer for d̶a̶t̶a̶ ̶h̶o̶a̶r̶d̶i̶n̶g̶ backups.
The parts involved:
- 2x Rosewill RC-20001 2.5GBASE-T PCIe Network Adapters with a RTL8125B chip (~$17 each)
- 1x Unifi Switch Enterprise 24 PoE with 12x 2.5G ports (A tiny bit more than $17…)
- 1x OpenBSD server with a retired GA-Z170X-Gaming-7 motherboard and a Core i7–6700 (I forget how much this thing cost)
- 1x TrueNAS Core server (previously FreeNAS) with a Supermicro X10SL7-F, Core i3–4160, 32GB ECC RAM, and a bunch of drives (More than I should have spent)
The Software
OpenBSD actually has built-in support for the RTL8125B, so the NIC was detected immediately at boot and just worked. Yay OpenBSD. TrueNAS, which is based on FreeBSD 12.2 as of writing, does not.
The rest of this section is about building on FreeBSD and installing the kernel module in TrueNAS Core.
FreeBSD Source
First, get a FreeBSD system up and running. Guide here for a fresh FreeBSD installation if needed. If your current TrueNAS system has a working NIC already, then great, use that — spin up a new jail and build inside. In your FreeBSD system of choice, get the source tree. As root:
pkg install git
git clone https://github.com/freebsd/freebsd-src.git /usr/src
cd /usr/src
git checkout release/12.2.0
Note: I don’t really recommend doing git checkouts as root since git has had code execution vulnerabilities in the past. Setup /usr/src as owned by an unprivileged user first, then perform the checkout as said user. Or, just don’t worry about it. You’re doing this in a Jail or VM, right?
Realtek Source
Realtek hosts the source for their drivers online for various operating systems. We’ll be using the “FreeBSD 7.x and 8.0” distribution, v1.96. The included Readme.txt has build instructions, but they seem to be wwaayyy more complex than necessary. My (fully working and copy-pasta safe) steps are below.
tar -xzf rtl_bsd_drv_v196.04.tgz
cp rtl_bsd_drv_v196.04/if_re.c /usr/src/sys/dev/re/
cp rtl_bsd_drv_v196.04/if_rereg.h /usr/src/sys/dev/re/
cp rtl_bsd_drv_v196.04/Makefile /usr/src/sys/modules/re/
make -C /usr/src/sys/modules/re
The module will be at /usr/obj/usr/src/amd64.amd64/sys/modules/re/if_re.ko. You’ll need to get it to the /boot/kernel/ directory in the TrueNAS system. How is left as an exercise to the reader (e.g. USB drive transfer, network copy, or from jail to host).
The Configuration
Normally on FreeBSD you would modify /boot/loader.conf[.local] to enable loading of this module at boot. However, this file is managed by TrueNAS and any manual changes will be wiped out.
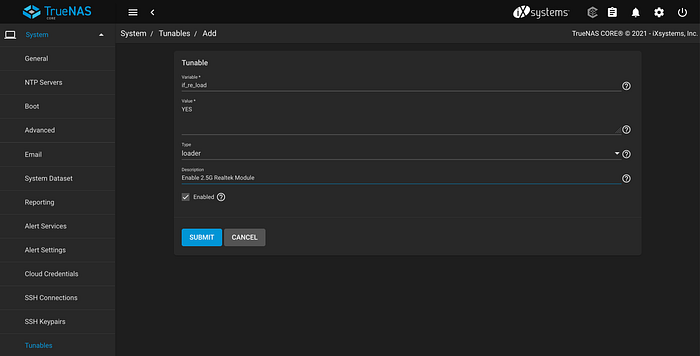
The proper way to enable is by creating a tunable in the TrueNAS UI. Navigate to System > Tunables and add a tunable with the following:
- Variable:
if_re_load - Value:
YES - Type:
loader - Enabled: Checked
And click Submit.
Reboot the system and configure the new network interface to work for your setup.
Note: If you don’t have access to the UI (if no network is available), you can temporarily load the module with kldload if_re.
The Test
We’ll focus on the network benchmark for this. The drives in the NAS can support 3–4 Gbps already, and benchmarking disk throughput is tricky anyway due to the oodles of caching going on.
For networking, I used iperf3, which is available in OpenBSD and FreeBSD (and probably all Linux) package managers. Note that iperf (2) is old and not fully functional — iperf3 should be preferred.
The throughput in both directions is pretty solid around 2.35–2.36Gbps:
$ iperf3 -c nas
Connecting to host nas, port 5201
[  5] local 10.0.1.2 port 23143 connected to 10.0.1.4 port 5201
[ ID] Interval           Transfer     Bitrate
[  5]   0.00-1.00   sec   281 MBytes  2.35 Gbits/sec
[  5]   1.00-2.00   sec   281 MBytes  2.36 Gbits/sec
[  5]   2.00-3.00   sec   281 MBytes  2.35 Gbits/sec
[  5]   3.00-4.00   sec   281 MBytes  2.36 Gbits/sec
[  5]   4.00-5.00   sec   281 MBytes  2.35 Gbits/sec
[  5]   5.00-6.00   sec   281 MBytes  2.35 Gbits/sec
[  5]   6.00-7.00   sec   280 MBytes  2.35 Gbits/sec
[  5]   7.00-8.00   sec   281 MBytes  2.35 Gbits/sec
[  5]   8.00-9.00   sec   281 MBytes  2.35 Gbits/sec
[  5]   9.00-10.00  sec   281 MBytes  2.35 Gbits/sec
- - - - - - - - - - - - - - - - - - - - - - - - -
[ ID] Interval           Transfer     Bitrate
[  5]   0.00-10.00  sec  2.74 GBytes  2.35 Gbits/sec                  sender
[  5]   0.00-10.05  sec  2.74 GBytes  2.34 Gbits/sec                  receiver
The speed above is pretty close to what is expected as there is significant overhead for the Ethernet, IP, and TCP headers. A standard Ethernet frame will have 1500 bytes in it (default MTU), which includes IP and TCP headers in our test.
Doing a quick packet capture, the TCP header size is actually 32 bytes with all the options in use (for my simple case).
The Ethernet packet itself has overhead. For every Ethernet packet transmitted, there’s also:
- Header: 14 bytes
- Preamble: 7 bytes
- Start frame delimiter: 1 byte
- Inter-packet gap: 12 bytes!
So for a standard 1500 Byte MTU, there’s an additional 34 bytes transmitted for the Ethernet header and signaling. Or effectively 1534 Bytes on the wire in total.
The data transmitted in each packet is only (1500–20–32) = 1448 Bytes. That gives an efficiency of 1448/1534 = 0.9439
And 1448 / 1534 x 2.5 Gbps ≈ 2.3598 Gbps, which is pretty much what what we’re seeing.
The Conclusion
Conclusion? Uhh, more bits == good? I don’t know what I’m supposed to say here.
2.5GBASE-T Ethernet is pretty cheap. I have another 2.5Gbps NIC built-in to a new gaming motherboard. The only thing lacking is more common switch support for this increased speed.